
How To Update Your Meta Payment Method
How to Update Your Meta Ad Account Payment Method
A step-by-step guide using Meta Business Suite — including how to pick the right ad account
This guide walks you through updating the payment method on your Meta (Facebook) ad account, starting from the very beginning. No prior experience is needed, and it takes about five minutes. Have your credit or debit card handy. We'll use Meta Business Suite, because it lets you choose exactly which ad account you're paying for — important if you manage more than one.
Step 1 Log in to Facebook
Open your web browser (Chrome, Safari, or Edge) on a computer — this is much easier than a phone. In the address bar at the very top of the browser, type facebook.com and press Enter. Sign in with the email and password you normally use for your business.
Tip: Use a laptop or desktop, not a phone, so every button in this guide is easy to find.
Step 2 Open Meta Business Suite
Go back to the address bar, type business.facebook.com and press Enter. This opens Meta Business Suite, the dashboard for managing your business's pages and ads. It looks like the screen below.
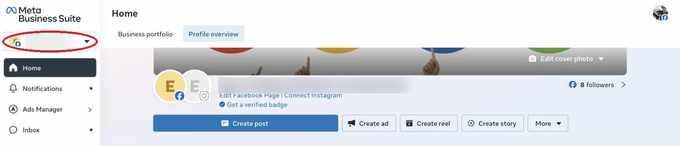
The button circled in red at the top-left (just under the Meta Business Suite logo) shows which business you're currently in.
Step 3 Choose the right business (if you have more than one)
If you manage more than one business or page, click that button at the top-left and select the business whose ads you need to pay for. If you only have one, you can skip this step — it's already selected for you.
Step 4 Go to Billing & payments
Now open the billing area. The most reliable way is to type this into the address bar and press Enter:
business.facebook.com/billing_hub/payment_settings
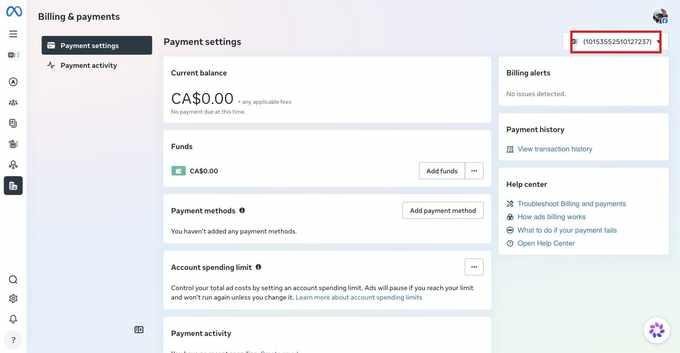
You'll land on the Billing & payments page, shown below. The box in the top-right corner is the ad account selector — that's what you'll use next.
Step 5 Select the specific ad account
Click the ad account selector in the top-right corner. A list of every ad account you have access to appears (see below). Use the search box at the top if the list is long, then click the ad account you want to update. The page reloads showing that account's billing details.
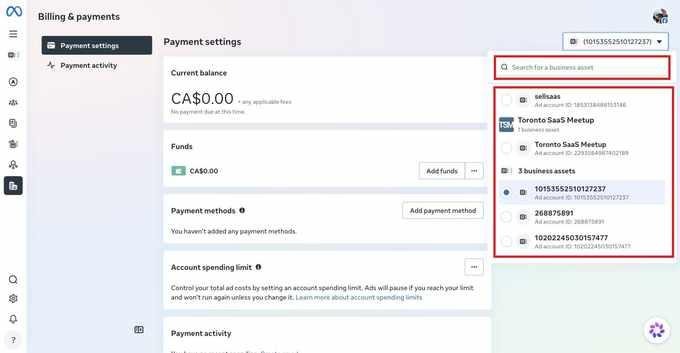
Tip: Not sure which account is which? Each one shows its Ad account ID. Match it to the account name or ID your Hubbli contact gave you before adding a card.
Step 6 Click Add payment method
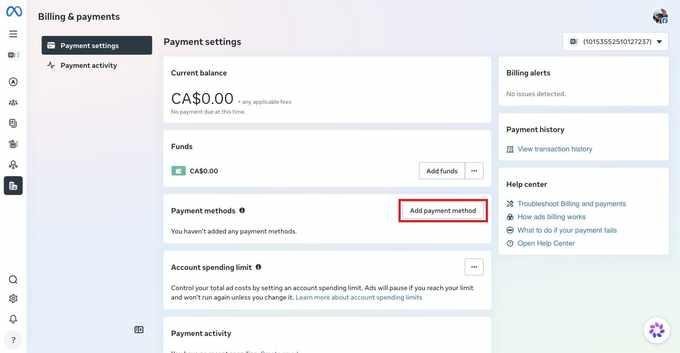
With the correct ad account selected, find the Payment methods section and click the Add payment method button (outlined in red below).
Step 7 Choose your payment type
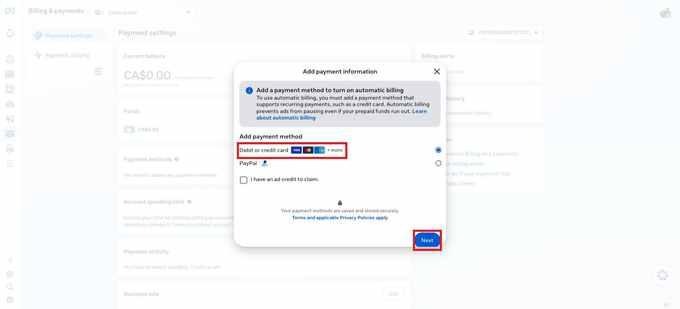
A window titled Add payment information opens. Leave Debit or credit card selected (the most common choice), or pick PayPal if you prefer. Then click the blue Next button.
Step 8 Enter your card details and save
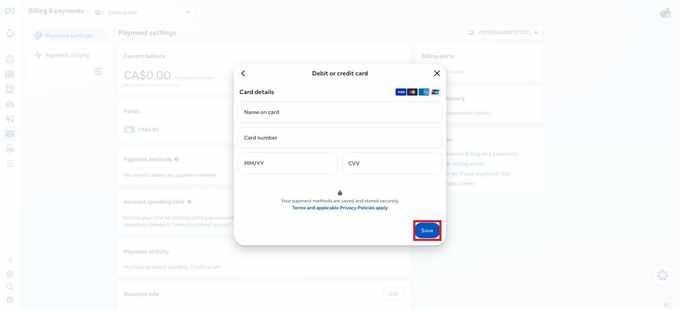
Type the name on the card, the card number, the expiry date (MM/YY), and the CVV security code from the back of your card. Double-check the numbers, then click the blue Save button. Your details are encrypted and stored securely by Meta.
Tip: Nothing is charged when you save the card. Meta only bills it as your ads run.
Step 9 Make the new card primary and remove the old one
If you were replacing an old card, both cards now appear under Payment methods. Click the three dots (⋯) next to the new card and choose Set as primary so it's the one that gets charged. Then click the three dots next to the old card and choose Remove. Meta won't let you remove a card if it's the only one on file or if it still has an unpaid balance.
If something doesn't look right
Wrong account showing? Go back to Step 5 and re-check the ad account selector in the top-right — it's easy to land on the wrong account when you have several.
Card declined? Confirm the card allows online and international purchases, then re-enter the details slowly. If it still fails, try another card or call your bank.
Can't reach Business Suite? Make sure you're logged into the Facebook account that manages your business, not a personal profile that isn't connected to it.